
Okay, so I started working. That's why I've been pretty MIA in blogland lately. I'm still trying to figure out this whole "juggling-of-the-schedule" thing, but I think I'm finally starting to grasp it a little bit.
If you've been wondering where I am, that's it in a nutshell.
We also sent the oldest (Big T) to camp this week. He left on Saturday and doesn't get back until Aug. 7th. The house is peaceful, and quiet, but in an eerie sort of way. There's definitely much less chaos in the house whenever you are able to get rid of your kids for a little bit ... or at least that's the way it is around here.
And in other news, Little M started preschool when I started working. He's adjusted well, which surprised the heck out of me, but I'm glad just the same.
What's nice is that I'm working part-time hours, and my boss is the hubster. Doesn't get much easier than that! What's not so nice is that I feel like a mad-woman Monday through Wednesday because I work AND go to school those days, and by the time Thursday rolls around all I can do is catch up on housework and laundry. Ugh ... however, I think that Friday I'm blocking out my afternoon for sewing ... I'll let you know how it goes.
Toodles.
Monday, July 19, 2010

Tuesday, July 13, 2010
Life ...
I'm still here ... I'm still alive. I'll update later, when life takes a bit of a breather ... maybe sometime next week perhaps.
Friday, June 25, 2010
Better luck next time ...
Today hasn't been one of those "hit it out of the ball park" days as far as sewing goes ...
First, I was trying to follow a tutorial for one of the requested bee blocks for Mary, and let's just say I was losing my mind trying to figure out what I was supposed to be doing. After a lot of cursing (thank the man upstairs that the kids weren't in the room), I decided that it would be best to send Mary her stuff back, as is, and let her finish the blocks. I'm sad to say that she's getting a bunch of fabric scraps randomly sewn together and nothing looks remotely close to a log cabin block.
Then, I was trying to finish up the circles block for Lori - and as I was cutting the circles out, the rotary cutter got away from me and made three tiny slits into her background fabric, making it useless to me. Ugh. So, she's also getting her block back, unfinished ... sheesh.
Finally, I thought I would try to redeem myself by tackling a Henrietta turtle pin cushion, compliments of the Heather Bailey pattern I bought forever ago. My Henrietta looks incredibly bloated. In fact, her feet don't touch the ground. I won't be posting a picture, don't ask.
It's been one of those days, full of sewing, but little accomplished.
I did manage to get this finished though:

And I hope that my partner for the Scrappy Pincushion Swap on Flickr enjoys it. It was the only good thing to come out of my studio this morning.
First, I was trying to follow a tutorial for one of the requested bee blocks for Mary, and let's just say I was losing my mind trying to figure out what I was supposed to be doing. After a lot of cursing (thank the man upstairs that the kids weren't in the room), I decided that it would be best to send Mary her stuff back, as is, and let her finish the blocks. I'm sad to say that she's getting a bunch of fabric scraps randomly sewn together and nothing looks remotely close to a log cabin block.
Then, I was trying to finish up the circles block for Lori - and as I was cutting the circles out, the rotary cutter got away from me and made three tiny slits into her background fabric, making it useless to me. Ugh. So, she's also getting her block back, unfinished ... sheesh.
Finally, I thought I would try to redeem myself by tackling a Henrietta turtle pin cushion, compliments of the Heather Bailey pattern I bought forever ago. My Henrietta looks incredibly bloated. In fact, her feet don't touch the ground. I won't be posting a picture, don't ask.
It's been one of those days, full of sewing, but little accomplished.
I did manage to get this finished though:

And I hope that my partner for the Scrappy Pincushion Swap on Flickr enjoys it. It was the only good thing to come out of my studio this morning.
Saturday, June 19, 2010

Tuesday, June 15, 2010
Movie night quilts ...
Between school, and the projects I've got going on here at home, there's not much time for quilting, but I am slowly (ever so slowly) working on sewing projects too.
I'm still participating in a couple of bees. One of them is soon to be finished, and then I'll just be in 2 bees. Whew ...
I'm also participating in a couple of swaps. One of which (the Pillow Talk Swap), I've already completed the work for that one ... my partner got her pillow and loved it! Here's what I sent:

I'm also participating in the Scrappy Pincushion Swap, but I'm still brainstorming as to what I'll make for my partner there. Unfortunately, there's no Flickr mosaic for inspiration, so I'm sort of winging it here.
And, on top of those things, I'm working on 3 quilts. We're trying to start a tradition of movie night at our house. At first, I thought this might be a once a week thing, but with the pressure of school, summer camp (for big T), work for the hubster ... anyway, movie night has turned into a "when there's a spare moment" thing. It's harder in the summer to get us all in one place to watch a movie. Not to mention that as soon as the lights go down, so do my husband's eyelids. I think he's probably seen 1 or 2 movies in his life, the rest were just opportunities for him to take a nap.
Because of that, I thought it might be nice for each of us to have our own movie night quilt. Something that reflected our personalities or what not, or just pretty. So, I'm working on 3 quilts at random. Luckily, 2 of those quilts have had a lot of help from the 2 bees that I'm in. But the third quilt (for Big T), I think I'm going to do all on my own, sampler style.
I love sampler quilts, and when I saw that Amy was doing a quilt-along, I couldn't pass it up. Here's a button to her blog with all the info you'll need if you decide to join along! I think I'm going to use scraps for this ...

I'm still participating in a couple of bees. One of them is soon to be finished, and then I'll just be in 2 bees. Whew ...
I'm also participating in a couple of swaps. One of which (the Pillow Talk Swap), I've already completed the work for that one ... my partner got her pillow and loved it! Here's what I sent:

I'm also participating in the Scrappy Pincushion Swap, but I'm still brainstorming as to what I'll make for my partner there. Unfortunately, there's no Flickr mosaic for inspiration, so I'm sort of winging it here.
And, on top of those things, I'm working on 3 quilts. We're trying to start a tradition of movie night at our house. At first, I thought this might be a once a week thing, but with the pressure of school, summer camp (for big T), work for the hubster ... anyway, movie night has turned into a "when there's a spare moment" thing. It's harder in the summer to get us all in one place to watch a movie. Not to mention that as soon as the lights go down, so do my husband's eyelids. I think he's probably seen 1 or 2 movies in his life, the rest were just opportunities for him to take a nap.
Because of that, I thought it might be nice for each of us to have our own movie night quilt. Something that reflected our personalities or what not, or just pretty. So, I'm working on 3 quilts at random. Luckily, 2 of those quilts have had a lot of help from the 2 bees that I'm in. But the third quilt (for Big T), I think I'm going to do all on my own, sampler style.
I love sampler quilts, and when I saw that Amy was doing a quilt-along, I couldn't pass it up. Here's a button to her blog with all the info you'll need if you decide to join along! I think I'm going to use scraps for this ...
Tuesday, June 8, 2010
Wanna win something cool?
I don't know why I'm sharing this news, because really, if you all signed up that hurts my chances of winning ... BUT, Amy is having an amazing giveaway where you have a chance to win a Go! Cutter!

Don't know what that is? Head on over to her blog and check it out - the details and how to enter are there too.
Don't say I didn't ever do anything nice ...
Don't know what that is? Head on over to her blog and check it out - the details and how to enter are there too.
Don't say I didn't ever do anything nice ...
Thursday, May 27, 2010
I get by with a little help from my friends ...

I sent out the fabric yesterday for "Bee Addicted", since I'm now taking over June. My idea was to have the girls do blocks for me based on Rita's block (pictured here). However, what I failed to realize is that I suck at quilting math.
You might think that there's no difference, but oh yes there is!
I can add, subtract, multiply and divide about as good as the rest of you, but when it comes to seam allowances and things of that nature, I'm all of the sudden stupid.
You see, I sent out jelly roll strips of printed fabrics for the block, since they're already cut 2.5" wide. I also sent out a 5" strip of Kona Bone for the solid. What I didn't think of is that when you actually make the hst's (that's half-square triangles for you non-quilting peeps), your little square is no longer 2.5".
DOH!
What I am lucky for, is that someone in our group caught my little mistake before the fabric even got to anyone. She's also a killer quilting math person! (Hi Debbie!) So, Debbie was able to make proper cutting measurements for all of us and this is the result:

A thing of beauty isn't it?
What it boils down to is that you're going to cut a total of 16 solid squares at 2" and 16 printed squares, also at 2". Then, you'll cut a total of 16 solid squares at 2.5" and again, 16 printed squares at 2.5".
To begin, take your 2.5" squares (16 solid, 16 printed) and make your hst blocks. I like to follow Rachel's instructions here. What I did differently is press open my seams rather than to one side. I figured that since there were going to be so many seams close together, it might help with the bulk. When you've sewn, cut, and pressed your hst's, cut them down to 2". Now they're the same size as the rest of your fabrics.
Once that's done, constructing the block is a breeze. See ...

And here's the finished back:

What you end up with is a block that measures 12.5" unfinished, rather than the 16.5" unfinished block that Rita made.
So, there it is, a mini-tutorial compliments of Debbie and her fine quilting math skills!
Thursday, May 13, 2010
Tutorial coming soon ...
In one of my quilting bees, it's my month in June. I had thought about doing this block back in January, and time got away from me with everything that was going on in our little corner of the world. So ... I was moved to October, but then the June person couldn't stay in the bee, so now I'm working the June month. Cool, huh? Did I lose anyone?
Anyway, I'm going to have the girls working on this block:

Rita, from Red Pepper Quilts is where I first saw this block. Now I'm seeing everyone on Flickr accomplishing it, but I contacted Rita anyway and asked if it would be okay to make a quick tutorial on this block on my blog for the girls in my bee. She graciously gave me permission to do so. Rita is awesome! If you've never been to her blog, I highly suggest that you do so, and also check out her Flickr photostream. You can be "oohing" and "ahhhing" for hours on end.
So, for all of my bee peeps, and the other followers I have here in blog land, you're in for a treat real soon, as I'll be posting a quick little tutorial on how to cut, piece, and make this beautiful block!
Check back soon - I hope to have this posted by Monday!
Anyway, I'm going to have the girls working on this block:

Rita, from Red Pepper Quilts is where I first saw this block. Now I'm seeing everyone on Flickr accomplishing it, but I contacted Rita anyway and asked if it would be okay to make a quick tutorial on this block on my blog for the girls in my bee. She graciously gave me permission to do so. Rita is awesome! If you've never been to her blog, I highly suggest that you do so, and also check out her Flickr photostream. You can be "oohing" and "ahhhing" for hours on end.
So, for all of my bee peeps, and the other followers I have here in blog land, you're in for a treat real soon, as I'll be posting a quick little tutorial on how to cut, piece, and make this beautiful block!
Check back soon - I hope to have this posted by Monday!
Sunday, May 9, 2010
What I did on Mother's Day ...
I had a fantastic Mother's Day. Did you?
The hubster went out and got us all donuts for breakfast (which I didn't need, but absolutely loved). I played with the kids for a little bit, then got to hide out in the studio for a big chunk of the day.
See ...

What does this mess mean?
The creative juices were flowing today and I made several sparkly things - most of which will show up in the shop this week (sporadically, mind you). So, make sure that you check out my Etsy shop throughout the week, because I'll be adding things just about everyday.
My hope is that once I've tapped the juices on the jewelry train, I can put this tote away again for a long time and work on some more quilting. I've been working on squares for bees, but not much for myself ... although I am slowly working on one of these. I'd like to make a few table runners or pillow slipcovers to put in the shop too.
So, what did you do for your Mother's Day?
The hubster went out and got us all donuts for breakfast (which I didn't need, but absolutely loved). I played with the kids for a little bit, then got to hide out in the studio for a big chunk of the day.
See ...

What does this mess mean?
The creative juices were flowing today and I made several sparkly things - most of which will show up in the shop this week (sporadically, mind you). So, make sure that you check out my Etsy shop throughout the week, because I'll be adding things just about everyday.
My hope is that once I've tapped the juices on the jewelry train, I can put this tote away again for a long time and work on some more quilting. I've been working on squares for bees, but not much for myself ... although I am slowly working on one of these. I'd like to make a few table runners or pillow slipcovers to put in the shop too.
So, what did you do for your Mother's Day?
Saturday, May 8, 2010
I love beans ...
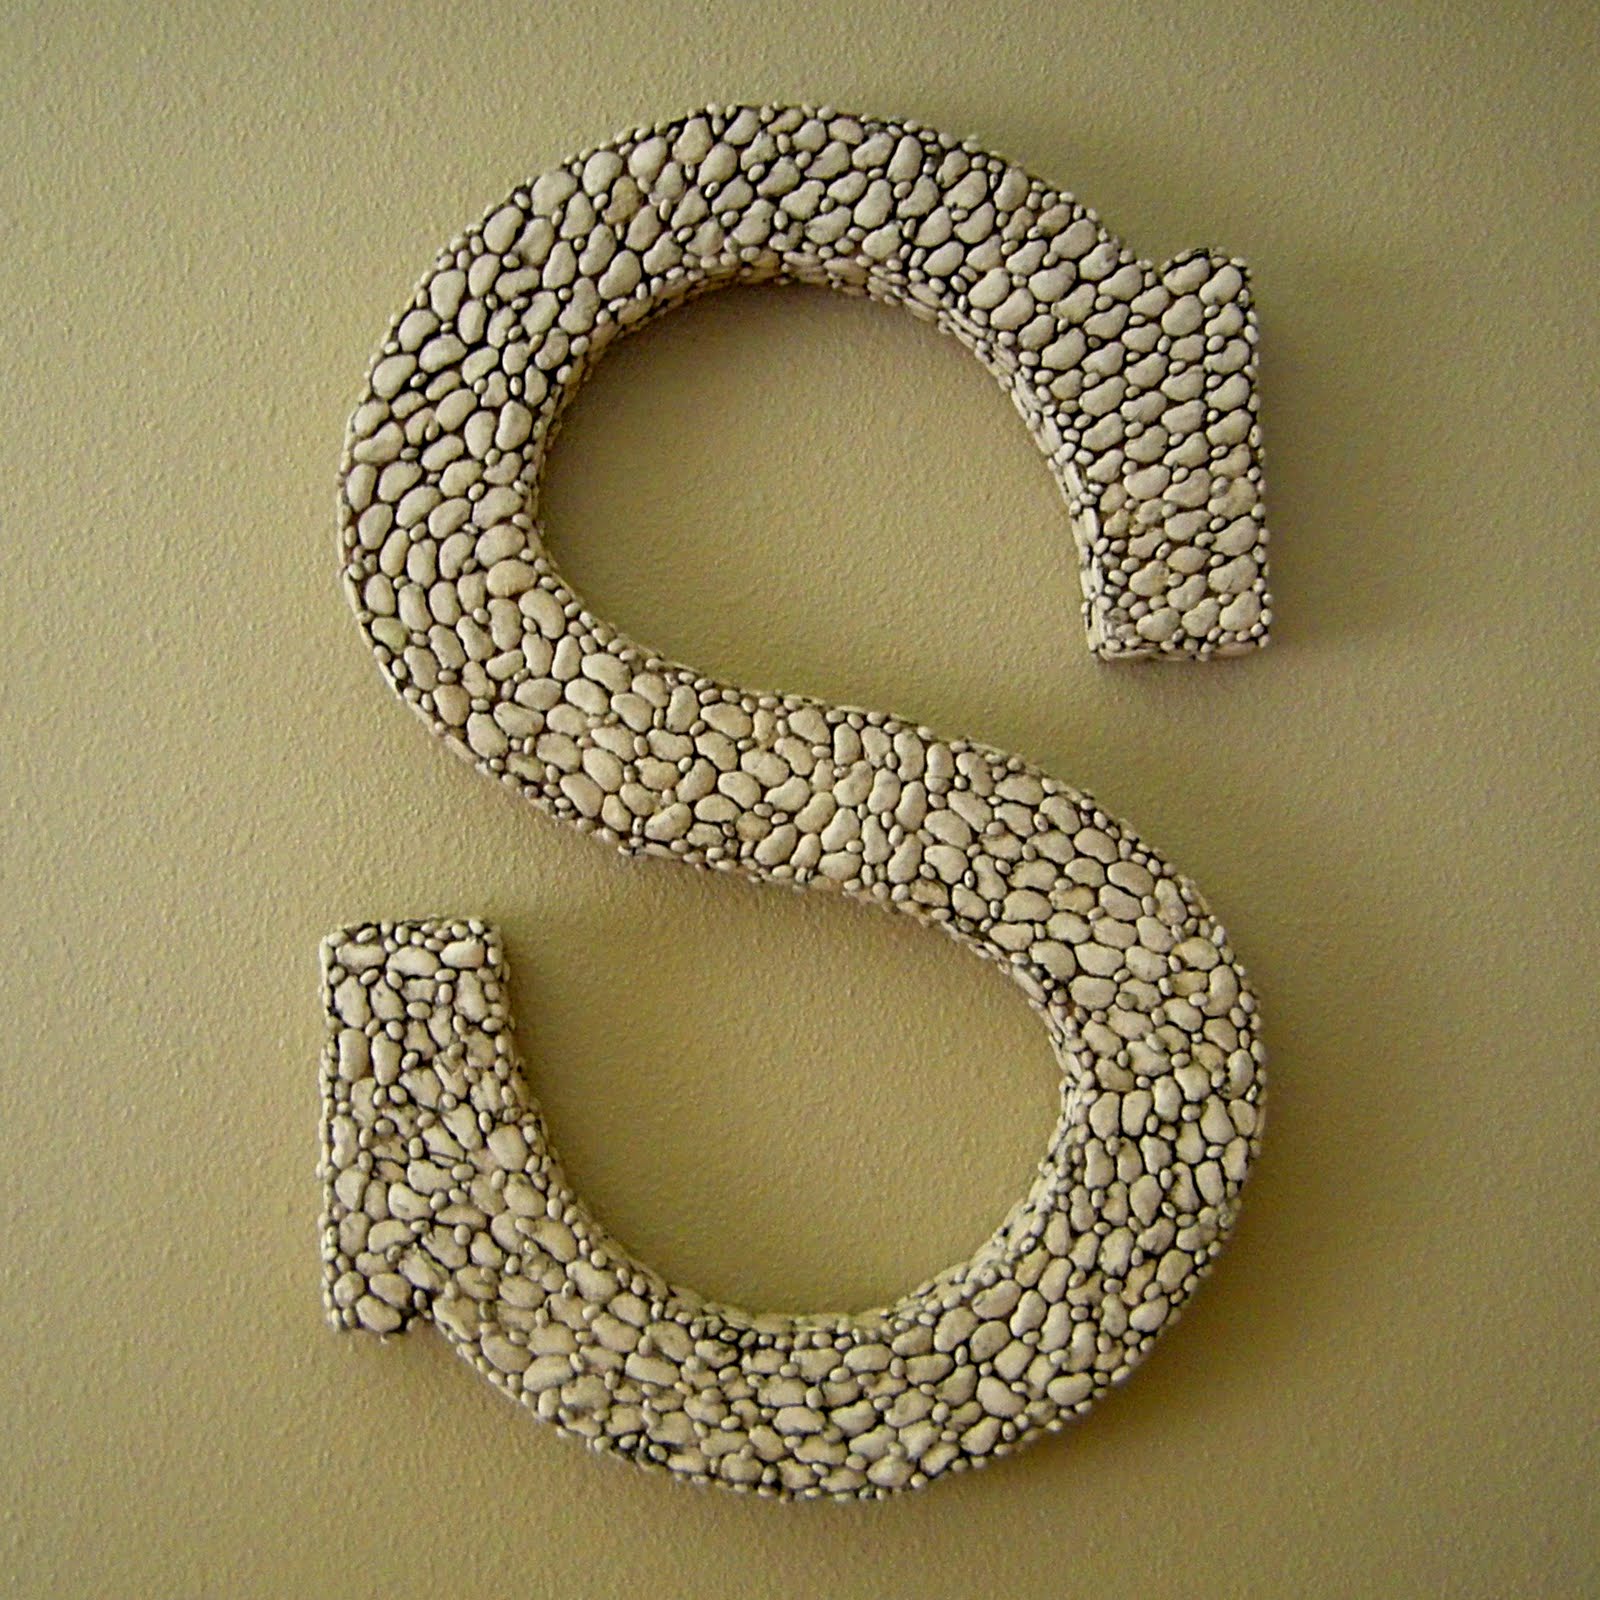
I've been seeing a lot of wreaths done with lima beans lately, so I thought it might be cool to do something with them as well. However, I'm not very "wreathy" ... in fact, I don't know how to decorate a good wreath that is worthy of my front door, so I have this skinny, almost-falling-apart "thing" on my door now. I think it used to be a nice circular grapevine wreath, but over the years somehow got stretched into the shape of an oval. There's a lot to be desired there ... but anyway, moving back on to the lima beans ...
Since I've been changing the decor of the house, slowly transitioning into things that are more contemporary / primitive ... sort of like Pottery Barn meets an actual barn ... anyone know what I'm talking about? No?
Well, I used to have this huge collage of photos hanging behind the couch. Not lots of photos in individual frames mind you, just a bunch of photos in one frame. You've seen them ... it's the lazy girl's way out of doing photos the right way. I say lazy because we still have the collage hanging up (on a different wall), but the photos haven't been changed since the day I hung it the first time ... there are no pictures of Little M in there at all. Yeah ... it might be time to do something about that.
So, now I have this big blank wall behind my couch. I was thinking that it might be cool to do something with lima beans and showcase it on the wall. And maybe later on down the road I'll hang some plates or something around it. The jury is still out on that thought ...
Here is what I came up with:

And this is how I did it (in exactly this order):
Step 1: Get thee to a JoAnns and buy the biggest initial you can find in their cardboard section (you know, where they sell the boxes for decoupage and all that jazz). They run about $8, but I used my coupon, so it was a score for me.
Step 2: Go to the grocery store and buy yourself some lima beans. I used the big fat ones and the baby lima beans. The baby lima beans were good "gap fillers".
Step 3: Take your supplies home, start gluing beans to the letter and realize after about 10 minutes that you're not cut out to use a glue gun. The blisters on your fingers prove it.
Step 4: Soak your blisters with some aloe gel. You may or may not say bad words when you do this part (at least I did ... oops).
Step 5: Call a friend who knows what they're doing with a glue gun and beg and bribe them to glue those suckers onto your God-forsaken letter for you. (Thanks Glenna!!) When they agree, get the supplies over to them before they have a chance to reconsider.
Step 6: Wait patiently until your friend finishes the gluing for you. This may take a while. Your friend will probably get blisters of her own - be sympathetic, offer her some aloe. ;o)
Step 7: When you finally get that hot little letter in your hands, paint it, glaze it, or do whatever you like to it to make it your own. Hang it up!

I thought long and hard about what I was going to do with my "S". I was going to paint it initially because that's what I'd been seeing everyone else doing online. But when I saw the work in person, the texture and the detail ... I just couldn't "cover" all of that, so I decided to let the beans shine in all their glory. All I did was run an antiquing glaze over it, wiped it down, and let it dry. Now, instead of looking like lima beans, it almost looks like it's covered in little rocks and pebbles. I adore it - and I am so thankful to Glenna for doing all of that gluing for me - you are the bomb girl!
So, what do you think? Do you like my "S"? What else should I put on the wall? Plates? Photos? Nothing??
Subscribe to:
Posts (Atom)

