skip to main |
skip to sidebar
So, what's a girl to do while there's men working on fixing the studio and the craft bug bites? Why, change something of course!
Little M went down for his nap and I began searching the house for something that's been on the "to do" list, but never actually got done. Mission accomplished ...
I bought this clock at a thrift store AGES ago. Case in point, the baby picture. I put that picture in it when I bought it (it was a recent picture). That kid is now 12. Yeah ... time for an update.
First things first. I filled the nail holes with wood putty. I left some of the nicks and scrapes for "character". Gave it a light sanding, then wiped it clean (then vacuumed it clean with the crevice tool since the layer of dust on it was just about jurassic).
I removed the picture from the bottom, covered and taped the top clock portion, and went to play in the garage with the spray paint.
Since I couldn't leave the house (there were guys working in the studio and the baby was napping, remember), I had to use what I had on hand. Flat black will work. I also sprayed a thin layer of poly for good measure (satin, because I hate shiny).
Let it dry outside since it's the perfect day for it - windy as all get out - brought it in after about an hour, popped a new picture in, which is only two years old, set the correct time and presto-chango! New clock!
Not bad for about two hours worth of work and supplies that I had on hand, and I'm linking back to the Shabby Nest to share ...
I can almost remember every detail of the day that I gave birth to little M. It was a day, just like today ... a little cloudy, a little cold, but beautiful just the same. He came (finally) in the morning, after 16 hours of labor and a little bit of pushing.
Little M was loved instantly. And here it is, 2 years later, and you still make us smile and make our hearts swell when we see that sweet little face. And boy, what a personality you're getting!
Right now, your favorite show is Yo Gabba Gabba. You jump up and down (as best as you can) when it comes on. You even sing along to the opening theme song.
You are a bookworm. You can't read yet, but you could sure look at books for days and days and days. Your favorite spot to "read" them, is tucked inside one of Mommy's Longaberger baskets.

You can count to 10, and have been for about 2 months now.
Your favorite letters are X, S, and W, because you push those letters constantly on your talking fridge phonics Leapfrog thingy. Constantly.
You are all about Mommy, until the second that Daddy walks in the door.
You can tear up a room faster than anyone I know.
You yell at your big brother when he comes around for hugs and kisses, but he makes you laugh harder than anyone else can. It's magic.
You're the best thing that ever happened to our little family of 3, and I'm so glad that you are the one that rounded us out to 4. We love you Little M!
 For months, I have been working on this quilt. Granted, I worked on it in spurts ... moments of time here and there when the moment was right and all was quiet around here. You see, my great-great-Grandmother and my great-Grandmother were both quilters. Not like me, they did everything by hand. And it was how they made their livings, and they were good at it. In fact, my great-Grandmother was still quilting until she died at the age of 99. Could you imagine?
Anyway, my grandmother never took up quilting. Sure, she could sew (I'm sure she was taught, although I never saw her do it). Her "thing" was crocheting and raising kids - she had 4 (3 of them were boys - so I KNOW that was work).
I used to live with my Grandma, briefly, in 1995 when I was transitioning from being a kid and growing into an adult. I hadn't found my niche in life, and it was a great time for her and I to be together. We had a lot of fun that year ... we went so far as to decorate everything in purple for Christmas. We were a couple of crazy girls, I tell ya.

Last August, when I started sewing and quilting, I thought it would be wonderful to make a quilt for my Grandma. She was worried that the art of quilting would be lost in our family, since no one else had made an effort to learn. I surprised her last fall with a letter and a picture of the quilt that I was working on for her ... I promised it for Christmas ... then time got away from me.
Luckily, her birthday is April Fool's Day. How funny, right? So, now that her quilt is finished, it's turned into a VERY late Christmas / birthday present. She doesn't mind, and I'm sure she'll love her quilt as it's very cold up there in Ohio right now.
So, Grandma - enjoy your little quilt from me and remember that while I was stitching this, I thought of nothing else but our time together.
Even though I didn't manage to get Jen's block finished, and I didn't get to finish the side cabinets for the entertainment center, I still managed to get a lot done. Grandma's quilt is completely finished. That alone is a HUGE weight off of my shoulders. I will blog about it tomorrow when I take better pictures of it ...
I also managed to get the "drapes" finished today. Say hello to the new look:

We used to have valances covering the top of the sliding glass door. It was okay, but still lacked in design and "oomph". I went to Target and bought a nice double drapery rod and hooks (with clips), bought 5 sheer panels for $5 each, and spent $20 on 2 drop cloths which were washed, ironed, hemmed and hung. So, all together I spent $132 for the new window treatments. The rings with clips and the drapery rod were expensive (the rod was $40 because it's a longer rod). However, what it's done for the room is beyond putting a price tag on it!
This is a nice shot too because you can see my new loveseat, there's a matching couch too - thanks Craigslist! You can also see how well everything goes with the new end tables I built. And of course I bought new lamps ... we call these the "bowling pin lamps" ... gee, I wonder why?
I could really use some inspiration to decorate the huge empty hole above the sliders. I was thinking a vinyl wall quote, maybe some big barn stars ... I am open to suggestions here!
Oh, and there's Mocha, doing what she does best! LOVE her!!
I managed to get Grandma's quilt, quilted and the binding attached. I still have to hand sew the back of the binding. I hate that part. My fingers always hurt, and the thimbles never fit.
I also managed to finish the two blocks that I needed to get finished for the pinwheel quilt along (button located on the right side bar for those interested in following along). I think they came out nice ... see ...
AND, I also started Natalie's quilt. It went from cut fabric squares this morning to a 70% finished quilt top tonight. No pictures until it's finished, because it is a gift and I want to keep some element of surprise. ;o)
So, I'm knocking out a lot of the things on my to do list for this week ... and now back to the hand sewing ...
It's gonna be a busy week for me. Yep.
I have to do the following, before Friday:
Finish binding my grandma's quilt (yes, it's FINALLY quilted).Begin piecing Natalie's quilt.Hem the new "drapes" that I bought (a.k.a. drop cloths turned curtains).- Finish building the two side cabinets on the entertainment center.
Keep up with the pinwheel quilt-along.- Make my block for Jen (another bee that I'm in).
It's not that there's anything going on that I HAVE to finish these things by Friday, it's more of a wish list of the things that I would like to accomplish. I've done so much to the house in the last couple of weeks, I feel like I could really use a vacation.
Keep checking in for updates on the studio progress (the floor is gone back there and the walls are bare). I think that Monday the walls will get the new texture.
I'm tired.
Only because I forgot to mention it in the last "room of doom" post - and quite frankly, it doesn't really "go" with that post. :o)
I built two end tables this past week for our living room. These were the secret, but not so secret, things I was building.
One more thing crossed off the to-do list, and now I can focus on finding a new couch and loveseat for the room. Not an easy task since I have a very small budget and no one will return phone calls or emails from Craigslist. I'll keep doing what I'm doing though ...

Let's take a tour of my soon-to-be changing studio. As you may remember, this is the room that took nearly 2 years for a general contractor to complete. This is the room that needed several "fixes" once we fired said general contractor. Did I mention that it took nearly 2 years to build, and the room is only 12' x 10'??
Upon entering the room, if you were to walk with me, you would notice that there's a slight slope to the floor when you walk in. This is because the floor in the studio is not level with the rest of the house. Lovely, yes?

If you look to the left, you will see my ugly storage cabinets. And my even uglier wire shelving unit. I have been using the cabinets to store fabric for quilting ... no, I will not open them and show you. It will make your eyes hurt. See that lovely mannequin head on top of the smaller cabinet? You may remember her from an earlier post. No, I do not usually decorate my living spaces with gaudy heads. Let's move along, shall we?
To the right, you'll notice that there are 2 sets of doors here. The doors that are leaning against the other set were once installed between the bedroom and the studio. I felt that removing them opened up the room a lot more - making it feel bigger and brighter. The doors are listed on Craigslist for a deal if you're interested. If I found out that the buyer was a blog reader, they'd get a hell of a deal! (wink wink) ...

Anyway, the doors that give us access to the outside are actually not the original doors that were installed. The original set of doors were not properly installed. This caused leaking into the house, which also caused leaking onto the flooring. See the ripped up flooring near the door? Yeah, apparently he didn't install a moisture barrier between the concrete and the laminate flooring. So, I have a lovely patch of concrete there that I've been looking at for about a year. Isn't it pretty?

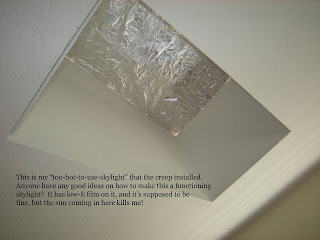
And finally, let's turn our eyes to the sky ... or should I say the skylight covered in foil. When I had it uncovered, the natural light in here was amazing ... gorgeous even. Until you walked into the room, then you felt like your skin was on fire. I was assured that the glass (or plastic, whatever it's made of), was tinted and would be energy efficient because it was also covered with something called Low-E film. What I've discovered from living here is that, tinted or not, this room BAKES in the summer! So, the foil was put in place over this past summer. I don't know what to do ... do I replace it? Do I have it uninstalled and just have the hole plugged up?? Ideas ... anyone??
Oh, and let's not forget to take a closer look at the texture of the walls and the ceiling. You see, in the rest of my house I have a very pretty texture called "spanish lace" on the ceiling and "orange peel" texture on the walls. In the studio however, I was given something called - "looks like a child threw oatmeal at the walls" texture on the walls ... and "didn't give a crap not even going to try" texture on the ceiling. Here's some pictures that show you what I'm talking about.


So ... my game plan is this ... next Saturday, a fine gentleman is going to remove the laminate flooring in here. He's getting a great deal on it - it's free - he just has to do all of the labor. I estimate that there's about 10' x 10' of good laminate in here that he'll be able to use. Once those are removed, there's another fine gentleman coming in to try and match the texture on the walls and on the ceiling to the rest of the house. From what I have been told, this is not an easy task (the matching) and I'm hoping for the best here. I will be sure to post photos of the progress of the room as it transforms.
Once the walls and ceiling textures have been established, the next task is leveling the floor and installing tile. I figured that tile would be more "sewing room friendly" as I can use the grout lines as a grid of sorts when I'm making quilts. It'll also hold the heat / cold better than the laminate was, because I do intend to figure out SOMETHING to do with that gosh darn skylight.
And thanks to Ana and her fabulous blog that I can't talk enough about ... I intend to build a few Cameron storage systems in here for fabric storage, a bench seat that is the length of the window (I don't think I showed you the window, it's just a window anyway - you're not missing anything), and eventually try and tackle building a Bedford Project table similar to what Pottery Barn wants to charge an arm and a leg for. Again ... all with pictures of the progress.
I'm guessing that this project is going to take a while to complete, but I'm also guessing that it won't take nearly 2 years. Take that Mr. lame general contractor! (And if you want to see any of the pictures bigger, just click on them ... but be forewarned, I can't be responsible for the hideous-ness of what you see)!

We also had people coming in and out of the house this weekend for estimates.
Two years ago, we had a room addition built onto the back of the house. It was a nightmare that lasted nearly a year and a half. When we fired the general contractor, we had a structurally okay room, but a cosmetic disaster on our hands. I couldn't even look at the room for a year because every time I went in it, all I could think about was the turmoil that it caused. It ended up being used for storage for a while.
Well, this past week I decided that I'd had enough. Someone is coming next weekend to rip up the laminate flooring in there, and we're going to basically start from scratch and get everything fixed. Maybe I should post some before and after pics??
Who wants to see my disaster room??

 I have big plans for this window, so I felt it was important to take a "before" picture. It's going to begin with a custom window treatment/building project that I'm going to do myself.


